Pages

Showing posts with label Mikrotik Configuration. Show all posts

Saturday, 18 May 2013

Usermanager + PPPoe Server

* PPP server configuration

/ interface pppoe-server server add interface=ether1 service-name=MikroTik one-session-per-host=yes disabled=no

/ ppp aaa set use-radius=yes

/ ppp profile set default local-address=192.168.0.1

/ radius add service=ppp address=y.y.y.y secret=123456

* PPP client configuration

/ interface pppoe-client add interface=ether1 user=MikroTik password=MikroTik service-name=MikroTik disabled=no

* User Manager configuration

/ tool user-manager customer add login=”MikroTik” password=”qwerty” permissions=owner

/ tool user-manager router add subscriber=MikroTik ip-address=x.x.x.x shared-secret=123456

/ tool user-manager user add username=demo password=demo subscriber=MikroTik ip-address=192.168.0.2

Introduction of Mikrotik Router OS

Before, dive into Mikrotik world,  I want to introduce Mikrotik
What is Mikrotik
Ans: MikroTik RouterOS™ is a router  operating system and software which turns a regular Intel PC or Mikrotik  RouterBOARD™ hardware into a dedicated router.
About Comapny
MikroTik is a Latvian company which was  founded in 1995 to develop routers and wireless ISP systems. MikroTik  now provides hardware and software for Internet connectivity in most of  the countries around the world. Our experience in using industry standard PC hardware and complete routing systems allowed us in 1997 to create the RouterOS  software system that provides extensive stability, controls, and  flexibility for all kinds of data interfaces and routing. In 2002 we decided to make our own  hardware, and the RouterBOARD brand was born. We have resellers in most  parts of the world, and customers in probably every country on the  planet. Features of Mikrotik RouterOS is MikroTik’s stand-alone  operating system based on linux v2.6 kernel. The following list shows  features found in the latest RouterOS release:   Hardware Support
  • i386 compatible architecture
  • SMP – multi-core and multi-CPU compatible
  • Minimum 32MB of RAM (maximum supported 2GB)
  • IDE, SATA, USB and flash storage medium with minimum of 64MB space
  • Network cards supported by linux v2.6 kernel (PCI, PCI-X)
  • Partial hardware compatibility list (user maintained)
  • Switch chip configuration support
Installation
  • M:Netinstall: Full network based installation from PXE or EtherBoot enabled network card
  • Netinstall: Installation to a secondary drive mounted in Windows
  • CD based installation
Configuration
  • MAC based access for initial configuration
  • WinBox – standalone Windows GUI configuration tool
  • Webfig – advanced web based configuration interface
  • Basic web interface configuration tool
  • Powerful command-line configuration interface with integrated scriptingcapabilities, accessible via local terminal, serial console, telnet and ssh
  • API – the way to create your own configuration and monitoring applications.
Backup/Restore
Firewall
  • Statefull filtering
  • Source and destination NAT
  • NAT helpers (h323, pptp, quake3, sip, ftp, irc, tftp)
  • Internal connection, routing and packet marks
  • Filtering by IP address and address range, port and port range, IP protocol, DSCP and many more
  • Address lists
  • Custom Layer7 matcher
  • IPv6 support
  • PCC – per connection classifier, used in load balancing configurations
Routing
r MPLS
VPN
  • Ipsec – tunnel and transport mode, certificate or PSK, AH and ESP security protocols. Hardware encryption support on RouterBOARD 1000.
  • Point to point tunneling (OpenVPN, PPTPPPPoEL2TPSSTP)
  • Advanced PPP features (MLPPP, BCP)
  • Simple tunnels ( IPIPEoIP) IPv4 andIPv6 support
  • 6to4 tunnel support (IPv6 over IPv4 network)
  • title=”Manual:Interface/VLAN”  href=”http://wiki.mikrotik.com/wiki/Manual:Interface/VLAN”> VLAN –  IEEE802.1q Virtual LAN support, Q-in-Q support
  • MPLS based VPNs
Wireless
  • IEEE802.11a/b/g wireless client and access point
  • Full IEEE802.11n support
  • Nstreme and Nstreme2 proprietary protocols
  • NV2 protocol
  • Wireless Distribution System (WDS)
  • Virtual AP
  • WEP, WPA, WPA2
  • Access control list
  • Wireless client roaming
  • WMM
  • > HWMP+ Wireless MESH protocol
  • MME wireless routing protocol
DHCP
  • Per interface DHCP server
  • DHCP client and relay
  • Static and dynamic DHCP leases
  • RADIUS support
  • Custom DHCP options
  • DHCPv6 Prefix Delegation (DHCPv6-PD)
  • DHCPv6 Client
Hotspot
  • Plug-n-Play access to the Network
  • Authentication of local Network Clients
  • Users Accounting
  • RADIUS support for Authentication and Accounting
QoS
  • Hierarchical Token Bucket ( HTB) QoS system with CIR, MIR, burst and priority support
  • Simple and fast solution for basic QoS implementation – Simple queues
  • Dynamic client rate equalization ( PCQ)
Proxy
  • HTTP caching proxy server
  • Transparent HTTP proxy
  • SOCKS protocol support
  • DNS static entries
  • Support for caching on a separate drive
  • Parent proxy support
  • Access control list
  • Caching list
Tools
  • Ping, traceroute
  • Bandwidth test, ping flood
  • Packet sniffer, torch
  • Telnet, ssh
  • E-mail and SMS send tools
  • Automated script execution tools
  • CALEA
  • File Fetch tool
  • Advanced traffic generator
Other features
  • Bridging – spanning tree protocol (STP, RSTP), bridge firewall and MAC natting.
  • Dynamic DNS update tool
  • NTP client/server and synchronization with GPS system
  • VRRP v2 and v3 support
  • SNMP
  • M3P – MikroTik Packet packer protocol for wireless links and ethernet
  • MNDP – MikroTik neighbor discovery protocol, supports CDP (Cisco discovery protocol)
  • RADIUS authentication and accounting
  • TFTP server
  • Synchronous interface support (Farsync cards only) (Removed in v5.x)
  • Asynchronous – serial PPP dial-in/dial-out, dial on demand
  • ISDN – dial-in/dial-out, 128K bundle support, Cisco HDLC, x75i, x75ui, x75bui line protocols, dial on demand

How to install Mikrotik In PC

You can install Mikrotik on regular PC but a dedicated Mikrotik Router Boards are available to install You can get various Router Boards on the official websitehttp://www.routerboard.com/ So, before install Mikrotik on Real hardware, I want to explore on   Virtual environment. I will use Virtual Box but you can use VMware   Workstation on Windows or Linux Systems. According to the Mikrotik, basic requirements are IA32 Hardware requirements
  • CPU and motherboard – advanced 4th generation (core   frequency 100MHz or more), 5th generation (Intel Pentium, Cyrix 6X86,   AMD K5 or comparable) or newer uniprocessor (multi-processor systems  are  not supported) Intel IA-32 (i386) compatible architecture with PCI   local bus
  • RAM – minimum 32 MiB, maximum 1 GiB; 64 MiB or more recommended
  • Non-volatile storage medium – standard ATA/IDE   interface controller and drive (SCSI and USB controllers and drives are   not supported; RAID controllers that require additional drivers are not   supported; SATA is only supported in legacy access mode) with minimum  of  64 Mb space; Flash and Microdrive devices may be connected using an   adapted with ATA interface.
Step 1: Create a Virtual Machine
  • Open Virtual Box & Click on New
  • Click on Next
  • Enter name of Virtual OS (as you wish) & select operating system type ( choose Linux – Other linux)
  • Enter amount of RAM (64 MB is sufficient for Demo, you can increase it to 2GB)
  • Click on Next( No need to change the values)
  • Finally click on create
Finally We have created  a Virtual Machine of Mikrotik Now step 2: Install MikrotikNote: Before start Machine go to  Settings-> Network -> Select  Network Adapter (If you have working  interface LAN / WLAN then you can  choose Bridge if you don’t have then  Select host only)
  • Start the Virtual Machine in Virtual Box Home.
  • Follow the Wizard & click on next
  • Select installation media (Physical Disk / ISO file) You can download ISO image from Mikrotik official website
  • Finally click on start
  • Select packages & press i to install & follow instructions
  • It will format the HDD & automatically install the Mikrotik.
Congratulations you have installed Mikrotik but before enter to reboot remove the Media or ISO image. Now you can access OS by the console, but if you are not familiar   with  CLI then you can use Mikrotik Graphical tool named Winbox. You can Download it from official Mikrotik Site (Download Section) but there is problem, OS doesn’t have any ip so you can access by the MAC.
  • Run the Win box & click on marked button
  • It is prompting you to 2 connection, just click on MAC Address
  • Enter user name : admin & Password : Block
  • Connect
If you getting any problem then you can assign IP Address to the OS or want to connect Winbox by the IP
  • Go to Virtual Machine Console
  • Enter User name : admin & Password is blank so enter
  • First of all check the interfaces
[admin@Mikrotik]>interface print It will show ether1 as interface, now assign IP Address to interface
[admin@Mikrotik]>ip address add address=192.168.1.50/24 interface=ether1 (* If you are using bridge interface  and you physical interface in  the 192.168.1.0/24 network then you can  assign this ip. If you selected  Host-only Interface then assign  192.168.56.101/24 as IP because in the  Virtaulbox host-Only adapters  works in this network.) Now again as well as last connect the Winbox by the IP address This is Winbox GUI Interface.   Congratulations you have installed & access the Fresh Mikrotik OS.

MikroTik RouterOS Firewall Basic

1.    Chain & Action
  • Firewall filter rules are organized in chains
  • There are default and user-defined chains
  • There are three default chains :
    • input – processes packets sent to the router
    • output – processes packets sent by the router
    • forward – processes packets sent through the router
  • Every user-defined chain should subordinate to at least one of the default chains
2.    Chain Input
Protecting the router – allowing only necessaryservices from reliable source addresses with agreeable load.
•    To deny access to router to the router via Telnet (TCP port 23)
/ip firewall filter add chain=input protocol=tcp dst-port=23 action=drop
3.    Chain Forward
Protecting the customers from viruses and protecting the Internet from the customers
Protecting Your Customer
•    Block IP addreses called “bogons”:
add chain=forward src-address=0.0.0.0/8 action=drop
add chain=forward dst-address=0.0.0.0/8 action=drop
add chain=forward src-address=127.0.0.0/8 action=drop
add chain=forward dst-address=127.0.0.0/8 action=drop
add chain=forward src-address=224.0.0.0/3 action=drop
add chain=forward dst-address=224.0.0.0/3 action=drop
4.  Condition: Connection State
  • Connection state is a status assigned to each packet by conntrack system:
    • New – packet is opening a new connection
    • Related – packet is also opening a new connection, but it is in some kind of relation to an already established connection
    • Established – packet belongs to an already known connection
    • Invalid – packet does not belong to any of the known connections
  • Connection state ≠ TCP state
5.    Address List
Firewall address lists allow user to create lists of IP addresses grouped together. Firewall filter, mangle and NAT facilities can use address lists to match packets against them.
The address list records could be updated dynamically via the action=add-src-to-address-list or action=add-dst-to-address-list items found in NAT mangle and filter facilities.
The following example creates an address list of people thet are connecting to port 23 (telnet) on the router and drops all further traffic from them. Additionaly, the address list will contain one static entry of address=192.0.34.166/32 (www.example.com):
/ip firewall address-list add list=drop_traffic address=192.0.34.166/32
/ip firewall mangle add chain=prerouting protocol=tcp dst-port=23 action=add-src-to-address-list address-list=drop_traffic
/ip firewall filter add action=drop chain=input src-address-list=drop_traffic
6.    NAT Type
As there are 2 IP addresses and ports in an IP packet header, there are 2 types of NAT .
1. which rewrites source IP address and/or port is called source NAT (src-nat)
  • performed on packet that are originated from natted network
  • a NAT router replace the private source address of an IP packet with anew public IP  Address as it travel trough the router.
2. which rewrites destination IP address and/or port is called destination NAT  (dst-nat)
  • performed on packet that a destined to the natted network,
  • it’s most commonly used to make ahost on private network to be accessible from internet
7.    Firewall NAT Structure
Firewall NAT rules are organized in chains, There are two default chains :
  • dstnat – processes traffic sent to and through the router, before it divides in to “input” and “forward” chain of firewall filter.
  • srcnat – processes traffic sent from and through the router, after it merges from “output” and “forward” chain of firewall filter.
There are also user-defined chains, Firewall NAT rules process only the first packet of each connection (connection state “new” packets)
8.    NAT Action (6 specific action NAT)
  • dst-nat and redirect
  • src-nat and masquarade
  • netmap
  • same
9.    Source NAT Action
  • Action “src-nat” changes packet’s source address and/or port to specified address and/or Port
  • This action can take place only in chain srcnat
  • Typical application: hide specific LAN resources behind specific public IP address
10.    Masquerade Action
  • Action “masquerade” changes packet’s source address router’s address and specified port
  • This action can take place only in chain srcnat
  • Typical application: hide specific LAN resources behind one dynamic public IP address
11.    Destination NAT Action
  • Action “dst-nat” changes packet’s destination address and port to specified address and port
  • This action can take place only in chain dstnat
  • Typical application: ensure access to local network services from public network
12.    Redirect NAT Action
  • Action “redirect” changes packet’s destination address to router’s address and specified port
  • This action can take place only in chain dstnat
  • Typical application: transparent proxying of network services (DNS,HTTP)
13.    Netmap & Same
  • Netmap – creates a static 1:1 mapping of one set of IP addresses to another one. Often used to distribute public IP addresses to hosts on private networks
  • Same – gives a particular client the same source/destination IP address from the supplied range for any connection. Used for services that expect constant IP address for multiple connections from the same client

Speedy Internet Connection with MikroTik RB750 , RB750G , RB750GL

MikroTik RouterBoard RB750 is the latest generation Mikrotik routerboard output is very small and designed for SOHO use. Has 5 Ethernet ports 10/100, with the new Atheros 400MHz processor. Is included with the license level 4 and 12V adapter. The RB750 series consists of 2, ie the RB750 and RB750G that support GbE (Gigabit Ethernet)-the rate of 1000 Mbit / s.
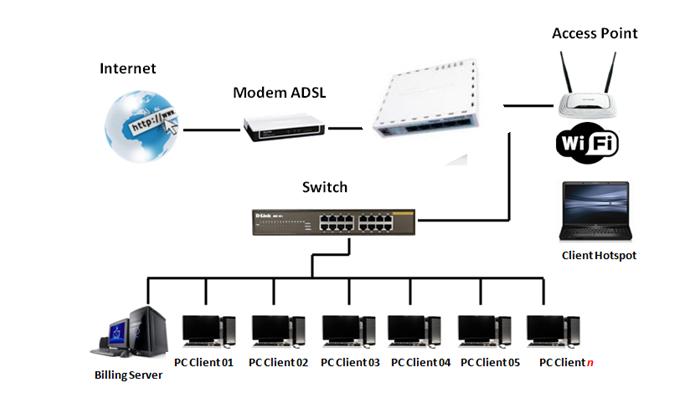
 simple topology mikrotik RB750
By default MikroTik RB750 was directly we can use as gateway for internet connection such asADSL internet connection with Speedy . Addition RouterBoard as this gateway will cause increased one hop (jump) again before the traffic in / out privileges internet, but it will not have much effect on the network that we will use. Speedy Internet Connection with MikroTik RB750From a short manual that I get outside the box MikroTik RB750, RB750 Mikrotik turns to use it very easily, following step by step internet connection with MikroTik RB750 as the gateway:
  1. Connect internet connection (cable UTP) from Speedy modem to Port 1 MikroTik RB750.
  2. To connect to a computer / client we can use Port 2,3,4 or 5, meaning a maximum of 4 pieces of the PC Client which can be connected directly.
  3. Further to the IP address settings for each PC Client we set the automatic. This is done for each connected client pc can get a dynamic IP address from the Router MikroTik.
  4. Make sure all connections are connected properly, can be done to check the following things:
    • check whether it can be the ip of the router, open a command prompt type: ipconfig / all, should every computer will get an IP address in the range between 192.168.88.10/24 up 192.168.88.254/24.
    • check whether it is connected to the Modem Speedy, type: ping 192.168.1.1 (the default address of the modem).
    • check whether it is connected to the Internet, type: ping google.com
  5. After all goes as it should, it means we’ve been able to connect to the internet.
Hence, one simple way of speedy internet connection using a mikrotik RB750. Afterwards we have to manage traffic are divided into each of the client computers.

Saturday, 11 May 2013

9 Tips to Stay Safe on Public Wi-Fi


Your bank calls you to verify your recent $750 bill at an out-of-state Taco Bell, but you haven’t left town in weeks. You quickly contest the charge and request a new credit card, but when you check your wallet the compromised card is still there. You try to think of shady ATMs or recent cashiers, but nothing comes to mind. Nothing, except the online purchase you made while browsing the Internet at your local coffee shop.

The number of free public Wi-Fi hotspots is growing, but not every hotspot can provide the protection of a private home network. Your notebook, tablet or smartphone’s default settings and firewalls may not be enough to keep you safe from prying eyes while on the go. If you want to keep your information and files secure, read these essential tips for protecting yourself when you’re away from home.

1. Turn Off Sharing

You may share your music library, printers or files, or even allow remote login from other computers on your Wi-Fi network in the privacy of your own home. Unless you disable these settings before connecting to a public Wi-Fi network, anyone else in the vicinity may be able to hack into your PC.
If you’re using a Windows PC, you’ll want to start by opening the advanced sharing settings of the Homegroup section of the Network and Internet settings in the Control Panel. From here, you’ll be able to toggle file and printer sharing as well as network discovery, which will make your computer visible to anyone connected to the same network. For Mac, just go to System Preferences, then Sharing, and make sure none of the options are checked.

2. Get a VPN

The most secure way to browse on a public network is to use a virtual private network. A VPN routes your traffic through a secure network even on public Wi-Fi, giving you all the perks of your private network while still having the freedom of public Wi-Fi.
While free VPN services exist, a paid VPN service guarantees the connection’s integrity. If you regularly connect to unknown networks, setting up a VPN is smart to protect your personal information.
One VPN provider is Private Internet Access, which costs $6.95 monthly and allows for unlimited bandwidth and multiple exit points, which will let you choose which country your network traffic is routed through.

3. Avoid Automatically Connecting to Wi-Fi Hotspots

Your smartphone or tablet may be set to automatically connect to any available Wi-Fi hotspot, a setting that can seriously endanger your privacy. Not only will this allow your device to connect to public networks without your express permission, you may also be automatically connecting to malicious networks set up specifically to steal your information.
Most modern smartphones have this option disabled by default, but this isn’t always the case, and it’s a setting you should always double-check. First, open the Wi-Fi section of your phone’s settings app. If you don’t see an option to disable auto-connecting, you’re already safe. Otherwise, turn this setting off.

4. Use HTTPS

Regular websites transfer content in plain text, making it an easy target for anyone who has hacked into your network connection. Many websites use HTTPS to encrypt the transfer data, but you shouldn’t rely on the website or Web service to keep you protected.
You can create this encrypted connection with the browser extension HTTPS Everywhere. With this plugin enabled, almost all website connections are secured with HTTPS, ensuring that any data transfer is safe from prying eyes.

5. Use Two-Factor Authentication

Two-factor authentication means you need two pieces of information to log into an account: One is something you know and the other is something you have. Most often this takes the form of a password and a code sent to your cellphone.
Many popular websites and services support two-factor authentication. This means that even if someone is able to get your password due to a hole in a public Wi-Fi network, they won’t be able to log into your account.
To enable this feature for Gmail, log into your account and open the settings page. Navigate to the Accounts And Import tab and click Other Google Account Settings. The second section will be two-step verification, and you can click Settings to start.
First, enter your phone number and choose whether you’d like a text message or a phone call. Next, Google will send a six-digit code to your phone. Enter this when prompted. Now, whenever you log into Google from a new computer, you’ll be asked to verify your identity by entering both pieces of info.
The login process will now take a few extra seconds when you use a different device, but you can rest peacefully knowing that your account is safe and secure.

6. Confirm the Network Name

Sometimes hackers will set up a fake Wi-Fi network to attract unwitting public Wi-Fi users. The Starbucks public Wi-Fi network might not be named “Free Starbucks Wi-Fi.” Connecting to a fake network could put your device into the hands of a malicious ne’er-do-well.
If you’re not sure if you’re connecting to the official network, ask. If you’re in a cafĂ© or coffee shop, employees will know the name of the official network and help you get connected. If there’s no one around to ask, you may want to move to a different location where you can be sure that the Wi-Fi network isn’t fake.

7. Protect Your Passwords

Using unique passwords for different accounts can help if one of your accounts is compromised. Keeping track of multiple secure passwords can be tricky, so using a password manager such as KeePass or LastPass can help keep you safe and secure.
Both KeePass and LastPass are free, but they store your information in different ways. KeePass keeps an encrypted database file on your computer, while LastPass stores your credentials in the cloud. There are pros and cons to each approach, but both services are completely secure.

8. Turn on Your Firewall

Most OS’s include a built-in firewall, which monitors incoming and outgoing connections. A firewall won’t provide complete protection, but it’s a setting that should always be enabled.
On a Windows notebook, locate your firewall settings in the Control Panel under System And Security. Click on Windows Firewall, then click Turn Windows Firewall On or Off. Enter your administrator password, then verify that the Windows Firewall is on.
These settings are in System Preferences, then Security & Privacy on a Mac. Navigate to the Firewall tab and click Turn On Firewall. If these settings are grayed out, click the padlock icon in the lower left, enter your password, then follow these steps again.

9. Run Anti-Virus Software

Always running up-to-date anti-virus software can help provide the first alert if your system has been compromised while connected to an unsecured network. An alert will be displayed if any known viruses are loaded onto your PC or if there’s any suspicious behavior, such as modifications to registry files.
While running anti-virus software might not catch all unauthorized activity, it’s a great way to protect against most attacks.
 

Sample text

Sample Text